CSS Selectors 101
Basic and Combination Selectors that will make styling your web page a bit less tortuous.

Having a good grasp of CSS selectors can help in reducing unnecessary classes in the HTML file, and the number of lines of code from your CSS file. Here are a few handy selectors to help you with selecting specific elements on your page.
Basic Selectors
Universal selector: The
*is a universal selector. It selects every element on the page, and hence, any style specified on this selector is applied to all the elements.This selector is commonly used to reset the padding and margins and set
box-sizing: border-boxat the top of the style sheet to make the box-model size computations easy.* { box-sizing: border-box; padding: 0; margin: 0; }Element selectors: Element selectors are used to select the various HTML elements by their tagnames.
divwould select all the div elements, andbodywill select the body element.A common use case is to set the background color for the web page and the font-family on the
bodytagbody { font-family: 'Inter', sans-serif; background-color: var(--dark-grey); color: var(--text); padding-bottom: 2rem; }Class selectors: Class selectors are probably the most commonly used selectors. These select elements having the same class names. Class selectors are declared by a period followed by the class name.
 //HTML
 <div class="sample-div">... </div>

 //CSS
 .sample-div {
   color: red;
 }
Since multiple elements can have the same class, they are used widely to provide multiple style properties to multiple elements in one go. For example, defining a property of
margin-bottom: 3remto the classmb-3makes it possible to just add the class ofmb-3to the elements that we want to have a bottom margin of 3rem. We no longer have to add that property individually to the elements.ID selectors: ID selectors select elements via their ID attribute. They are declared by a # followed by the element ID.
 //HTML
 <div id="hashonde-like-button">... </div>

 //CSS

 #hashonde-like-button {
   color: blue;
 }
Attribute selectors: Attribute selectors are used to select elements with a specified attribute. They are declared by enclosing the attribute value within square brackets
// selecting all elements with a custom attribute of id-type = "student"
[data-id-type="student"] {
 background-color: green;
}

// selecting all elements having a custom attribute of id-type
// regardless of the value

[data-id-type] {
 background-color: yellow;
}
Selector Combinations
Combining the basic selectors, namely the element, class, and ID selectors, is where things get interesting. Combining them allows us to be very specific about our selection and the styles applied.
Instead of adding classes over classes to get the desired styling effect, using selectors combinations skillfully will help reduce code length and make your stylesheet easy to maintain.
Declaring multiple selectors one after the other without any spaces between them acts as an AND operation. Only elements having all the specified selectors are selected.
Here's how to select an element that is a div and has a class of
bg-greenand an id ofid1div.bg-green#id1 { font-size: 2rem; }A set of styling can be applied to multiple elements or selections by separating them out via commas.
Here's how to select all the
spanelements andpelements having atext-boldclassspan, p.text-bold { background-color: violet; }A space between the selectors denotes a descendant selector. They are used to select elements that are descendants of another element. Selecting all the p tags inside elements having a class of
containerlooks like this:.container p { margin: 1rem 2rem; }A
>denotes a child selector. They are used to select elements that are immediate children of another element.A good use case of the child selector is in styling list items. Instead of adding a class to each list item, a class can be added to the
<ul>or<ol>containers and their child lists can be accessed via child selectors.// HTML <ul class="list-container"> <li>Item 1</li> <li>Item 2</li> </ul> // CSS // selecting all the li items .list-container > li { color: purple; }Descendant vs Child
A child selector only selects the immediate child whereas the descendant selector selects all children regardless of how deeply nested they are with respect to the parent.
Here's a code snippet to explain it a bit more
<ul class="parent-list-container">
 <li>Item 1</li>
 <li>Item 2</li>
 <ul class="nested-list-container">
   <li>Nested item 1</li>
   <li>Nested item 2</li>
   <li>Nested item 3</li>
 </ul>
 <li>Item 3</li>
 <li>Item 4</li>
</ul>
We have 4 list items and another nested list inside the
parent-list-containerlist.Here's a descendent selector
.parent-list-container li {
 color: blue
}
and here's a child selector
.parent-list-container > li {
 background-color: skyblue;
}
Here's how the output looks:
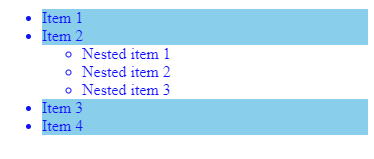
Notice how the child selector only selected the li elements that were direct children of the parent, while the descendant selector chose all the li elements contained within the parent.
A
+denotes an adjacent sibling selector. It is used to select elements that are the first sibling of another element.Selecting the first
<p>that immediately follows an element with afirst-childclass.first-child + p { background-color: aquamarine; }This styling will only be applied if a
pelement is the immediate sibling of.first-child. It won't be applied if it is any other sibling.A
~denotes a general sibling selector. It is used to select elements that are siblings to another elementSelecting the
<p>elements that are siblings to an element with afirst-childclass.first-child ~ p { font-weight: 600; }Adjacent and General sibling selectors in practice:
// HTML
<div class="container">
 <p class="first-child">This is the first child of 'container'</p>
 <p>This is the first sibling of the first child</p>
 <p>This is another sibling of the first child</p>
</div>

// CSS
// adjacent sibling
.first-child + p{
background-color: aquamarine;
}

// general sibling
.first-child ~ p{
 font-weight: 600;
}
Output:

Wrap-up
Those were the basic selectors in CSS. These selectors can also be used in JavaScript in the querySelector() method. The selector string that's specified inside the method is the same as CSS selectors.
I've left out one type of selectors in this article - the pseudo-class selectors. That's because I wanted this to be a beginner-friendly article. Pseudo-class selectors take things up a notch and so require an article of their own. Till then, keep practicing these basic and combination selectors!